Years ago, I was flying my Piper Aztec into Memphis on a very busy low-IFR day. They were running parallel approaches into runways 36L and 36R. The conga line of aircraft seemed to extend forever. About 30 miles out, center switched me over to Approach Control, who promptly began to give me vectors to nowhere; or at least nowhere that made any sense relative to the final approach courses for either runway. The staccato pace of the controllers’ voice did not lend itself to asking questions, so I kept quiet and followed instructions.
About 20 minutes later, I managed to wedge my “N” number and the word “request” into the conversation, which, of course, pleased nobody, especially the controller. I was tersely asked, “Say approach speed.” I responded with “120 knots,” lying by 5 knots hoping to win him over – no luck. After another 15 or 20 minutes of “vectors,” he told me he needed 135 knots to short final. At this point, fuel remaining was becoming an issue, so I nervously acquiesced and brought the throttles up on both engines. I had never flown an approach that fast before and what followed, though legal, was anything but pretty, especially with another aircraft on a parallel approach. I’m certain I had the controller on the edge of his seat as I made a few lateral and vertical “excursions.” I was certainly out of my element, but fearing endless vectors until the fuel ran out, I was not about to say “unable.”
I think they were just glad to get me out of their hair when the tower controller simply told me to land anywhere. After I taxied into Wilson Air and shut down, I noticed my shirt was soaked; not unusual for Memphis, except it was mid- February. After exchanging pleasantries with the front desk attendant at the FBO, and allowing my shirt to dry out, I looked up Approach Control’s phone number and asked for the floor supervisor. We talked for a while about how I could have made myself a little more welcome. What followed was enlightening and in the 20-plus years hence, I’ve never had a problem fitting in. One of the things I learned was though the controller may ask you for “best forward speed,” what they really need/want is the indicated speed you are willing or capable of giving them to about a 2-nm final. What seems to work almost everywhere is 150 knots to the Final Approach Fix (FAF) and 130 knots inside the FAF. That almost always fits you in with the big boys and brings us to the topic of this article – flying a high-speed approach.
Granted, flying an initial approach at 150 knots indicated is not for everyone (and yes, I understand that once cleared for the approach all speed requests are voided), but with preparation and practice, it’s not that difficult. Even if you don’t expect to ever fly into a large Class B airport, some Class C hub airports frequently get very busy. Try getting into Indianapolis, Milwaukee, Portland or Raleigh/Durham during peak time.
Those of you who have read other articles I’ve written for this magazine will know that despite my past sins, I have matured into, and encourage you to become a “by-the-book” kind of pilot. I bring this up because you are not going to find what we are about to discuss in the Cirrus Flight Operations Manual. What I am going to walk you through is a technique that under certain circumstances can be very useful to yourself, the controllers and other pilots. Do not attempt this for the first time, like I did, in low IMC conditions. Instead, you should try this at home with a knowledgeable CSIP on board and if you expect you might use it, be sure to become proficient at it first in VFR conditions. Despite the late change in configuration, you should meet stabilized approach criteria by 1,000 feet AGL.
The Nuts and Bolts
The high-speed approach begins 50-plus nm out from the destination airport. Obtain the current ATIS information as far Volume 15, Number 3 COPA Pilot | 43 out as reception allows. This will provide you with the expected approach and runway in use. Remember to occasionally recheck this frequency as you proceed inbound as information may change, although it is unusual for the runway to switch. Set up for the anticipated approach and select the correct approach plate. Thoroughly brief yourself on the approach. For quick reference, I also suggest highlighting the ILS frequency, final approach course, DA and first segment of the missed approach. If possible, try to accomplish this while you are still talking to Center. Once you are handed off to Approach Control, things will start getting very busy, very quick.
If the airport has parallel runways or simultaneous approaches to different runways, then set up for the approach you are most likely to receive, given your direction of arrival. In many cases (particularly Minneapolis, Denver and Memphis), controllers will bring you in on the runway closest to the general aviation FBO. Your first clue that runways may get switched on you is if the approach controller is asking you where you are parking. Be prepared to reload an approach. That way if the controller changes runways on you, and trust me, that will happen at the most inopportune time, then you at least are somewhat prepared.
These photos were taken while flying a GPS/LPV approach at “high speed” in a Cirrus SR22TN, with Avidyne R9 avionics. Weather conditions were 3-miles visibility, with light winds amounting to less than 4 knots of headwind component at the surface. Winds at each altitude can be seen on the PFD, just below the airspeed tape.
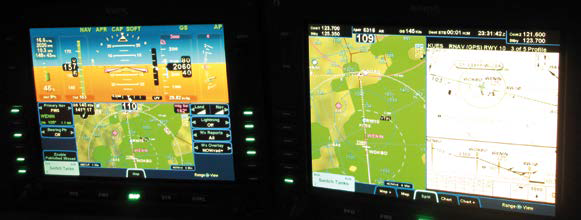
Aircraft position is 1.1 nm inside the FAF (WOKBO). Note the speed at 157 KIAS, with 16.6 inches MAP. The approach light system is just coming into view at the base of the haze.

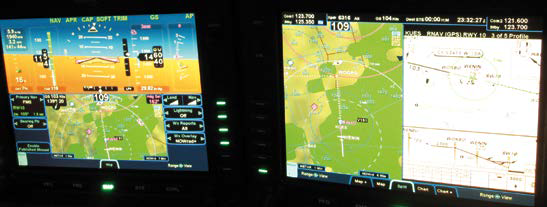
Aircraft position is crossing WENIN intersection (2.0 nm from the missed approach point and the runway threshold). Speed is 144 KIAS and power is back to 8.9 inches MAP.
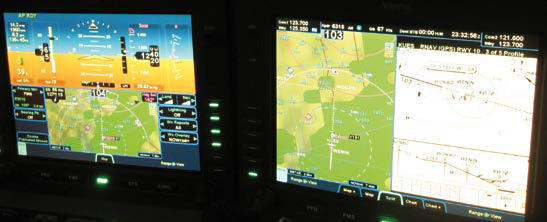
Aircraft position is now 1.5 nm from the missed approach point (only 0.5 nm inside of the previous photo). However, in that one-half nm, the speed has dropped to 115 KIAS (a loss of nearly 30 KIAS in only 0.6 nm), which is 4 knots below the max speed for 50% flaps. Power is back to 5.9 inches MAP and 50% flaps have been extended at this point. Runway and PAPI lights are fully in view now.
While not a normal procedure or speed, this photo is included to further illustrate the point. Here the airplane is 0.8 nm from the missed approach point and 130 feet above the decision altitude. Speed is all the way back to 76 KIAS, full flaps have been extended, and power has been applied (to 14.2 inches MAP) to stabilize at that speed and configuration. While this is slower than recommended approach speed(regardless of configuration), it illustrates that approach speed can be rapidly dissipated with aggressive power reductions and timely flap applications.
You have the current ATIS information (rechecked) and the approach selected and briefed. Descent checklist has been completed and center has just switched you over to Approach Control. Check in with Approach, giving them your altitude and the ATIS identifier, but before you release the push-totalk switch, go ahead and tell the controller you can give him 150 until the “marker” or FAF and 130 to a 2-mile final. If the frequency is busy, this part can wait until you are given vectors or handed off to the final approach controller. However, the sooner you can communicate this information, the easier the controller can sequence you into the lineup.
At this point, begin to slow to an approach level clean indicated airspeed of 150 knots. If you don’t know the power setting required for this, find out on your practice runs. In most circumstances it will be very close to cruise power settings. Remember, the approach controller does not care what your groundspeed is, only your indicated airspeed. Now you are ready to join the lineup with the big boys. You will be sequenced in trail with separation based on the proceeding aircraft's wake turbulence category – more about this later.
On the Localizer
Under most circumstances, you will be sequenced onto the localizer well outside the final approach fix, but you may not yet be cleared for the approach. Do not intercept the glideslope or begin any descent until cleared or otherwise instructed. All checklists and approach briefings should have already been completed and the aircraft configured for the approach. In this case, it will be a cruise level configuration with no flaps and an IAS of 150 knots. This is a good time to be on your game and ahead of the aircraft. There is nothing magic or overly difficult, but you need to focus and keep your scan up.
Approaching the FAF, be prepared to intercept the GS and to throttle back. I suggest beginning to reduce power one dot (hash mark) below glideslope intercept. As you begin to descend on the glideslope, continue the power reduction to your target airspeed of 130 knots. Know what power setting, in either manifold pressure or percent power, will give you a 130 knot IAS on a three-degree glideslope. For most generations of Cirrus aircraft this will be a power reduction to approximately 12-13 inches manifold pressure or 25-30% power. Remember, configuration change is delayed, so no flaps initially on the glideslope. The aerodynamic braking effect of the prop at low power will easily allow you to slow to flap operating speed in the last 2 miles to the runway threshold.
There are a couple of other aspects to the approach that will be different. First, recognize your vertical speed required to stay on the glideslope will be much higher than you are used to. This will be on the order of 650 fpm for 130 knots, nothing dramatic, but not what you are used to. Also, understand that power settings to maintain 130 knots can vary depending on the amount of headwind/tailwind you are experiencing. Secondly, if there is any question of wake turbulence, though generally not necessary, consider flying one dot (hash mark) high on the glideslope all the way down. Remember, this technique is to be used at large airports with heavy aircraft creating significant wake turbulence. Flying above the glideslope will put you further down the runway relative to the touchdown zone. If necessary, the technique here is to ask the tower to “land long.” You are likely dealing with runway lengths of 7,000 to 11,000 feet and I have never been denied the request to land long. For safety reasons I suggest you don’t accept LAHSO (land and hold short) restrictions. Lastly, you should fly this type of approach using the autopilot. Good single pilot resource management dictates reducing workload on this high-speed approach and the autopilot goes a long way in helping you stay ahead of the airplane. If you are flying a one dot high profile on the glideslope, then you will have to do this by hand, so practice your hand flying skills and stay proficient.
The Final Miles
Two miles from the threshold, or approximately 1,000 feet AGL, you should begin to retard the throttle to idle. The cylinder head temperatures should be well below 350 degrees, so shock cooling is not an issue at this juncture. Nonetheless, pull the throttle back to idle slowly to avoid excursions on the glideslope, then just wait. Non-turbo pilots will have to be a little more patient, but you will slow down. For a pre-G5 SR22 add 50% flaps upon reaching 119 knots and for a G5/G6 simply check airspeed before adding the flaps. Counter the expected pitch up with a little forward pressure on the side stick to help the autopilot stay on the glideslope. Hold your configuration until DA, which will be coming up shortly. Upon seeing the runway, check your speed and add full flaps. This will often require restoring some power to maintain 80 knots and your descent path to the runway threshold. Cirrus, as stated in the iFOM, now indicates that landing with 50% flaps is an option if breaking out at 500 feet AGL or lower and is what I now teach. Of course, if you don’t see the runway at DA, immediately execute a missed approach; the aircraft is already appropriately configured.
You Can Do It
This is a lot to remember, but with a little practice, anyone proficient at instrument flying can do it. Practice in VFR conditions with a safety pilot. Learn your power settings in various configurations for the different airspeeds; this is critical for reducing the workload.
Many times, even at large airports, there will be no need to fly a high-speed approach. But, when the weather is poor, airplanes are stacking up and fuel is getting short, being capable of fitting into the flow will make you a lot of friends. Approach controllers, tower controllers and most of all, the other aircraft, will all benefit from your skill at this type of approach. It requires training and practice, as does any aspect of flying if you intend to strive for higher standards. The satisfaction of flying like a pro is well worth it, especially when you hear “nice job” or “thanks for the help” from the tower controller as the wheels touch down. No need to wipe that smile off your face – you can carry it in to the FBO at no extra cost.
This article was initially published in the April 2020 issue of COPA Pilot