Have you ever been flying on a VFR cross-country trip and found a Military Operations Area (MOA) in your path? I imagine it happens to everyone. I check the sectional maps for restricted areas and MOAs before a flight, and usually I set up my flight plan to fly around those areas.
But when bad weather rears its head, I will deviate around it, and sometimes that puts me in an unfamiliar area that I had not briefed before the flight. There may be an MOA right in my path; or perhaps I want to take a shortcut under or over the MOA and not have to fly around it. Maybe I need to stop for fuel, but the nearest airport is located under an MOA.
How do you find the vertical boundaries of an MOA? The Avidyne MFD shows airspace boundaries for class B, C and D, but not MOAs. Fortunately, the Garmin 430 radio has this information. It does take a few button pushes and knob twists (in typical Garmin fashion).

Figure 1: The Avidyne MFD shows a yellow line on the right side, which specifies there is an MOA located in the area.

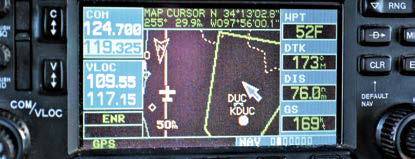
Figure 2: The Garmin 430 shows the MOA on the right side of the screen also with a yellow line.
Refer to Figure 1 for an example. I am flying from Oklahoma to Texas and I want to divert to Duncan (DUC). Let’s assume there is bad weather ahead, and the airports to the east (left side of the MFD) are IMC. Duncan is VFR but is under an MOA (right side of the MFD). The yellow line shows there is an MOA located in the area. Can I fly there? Let’s look at the Garmin 430 screen (Figure 2). The MOA is visible on the right side of the screen (yellow line).

Figure 3: The 430 will specify you’re in cursor mode by displaying an arrow.

Figure 4: By using the outer knob to move the arrow to the right, place the cursor inside the MOA, which will highlight the outline.
Press the right inner knob, to go to the cursor mode. The arrow will appear on the map as shown in Figure 3. Next, scroll the arrow to the right using the right outer knob. (The inner knob will move the cursor up and down.) Position the cursor inside the MOA, causing an outline of the MOA to appear highlighted (see Figure 4).

Figure 5: By pressing ENT in the highlighted area, a pop-up message will appear. Select “Review Airspace?” by moving to it and pressing ENT again.
Press the ENT button and a pop-up message will appear asking if you want to “Review Airspace?” or “Create User Wpt?” Press the ENT button to select “Review Airspace?” (Figure 5).

Figure 6: The MOA information will appear on the display showing it is the “Shepard Two” MOA and the vertical boundaries which are located on the lower right.
Information on the MOA will then appear. This is the Shepard Two MOA and the vertical boundary is 8,000 to 18,000 feet (see Figure 6).
In other words, to fly under the MOA, I just need to stay under 8,000 feet. For a westbound VFR flight, I would choose 6,500 feet or lower.
On most flights, I would use this function to double-check any airspace that I’m passing under or over. This is especially important when flying under a Class B shelf. Who needs a violation?
I learned how to do this at my first CPPP in 2004 and have been using it ever since.
Thanks COPA!
This article was initially published in the April 2020 issue of COPA Pilot